

It is "summer vacation" for us, which means that instead of going to preschool for 9+ hours a week our now four year old daughter is home, all the time. I love her to bits, but she is busy. She and her two and a half year old brother can get a little stir crazy in their daily attempts to wear me out. This summer, though, I am trying to persevere by finding the right combination of structured (activities and outings) vs unstructured (time they can play with their toys, and mommy can too) time!
Overall, we are enjoying not being on someone else’s schedule and with the help of friends, we are filling our time quite nicely. I see when a week of summer camp fun may be neccessary around mid-July, in the meantime, I am trying to avoid being on a daily camp schedule.
As part of our structured time, and in my attempt to fulfill my need to teach my kids, I am trying to continue the kids' concrete learning- letters, numbers, and maybe even reading a word or two.
Today, I channeled the teaching career path I was supposed to take (at least that is what the nuns told me I should do when I grew up) and find some ways to help her learn how to write her ABCs and I arrived at a project that was hatched a few days ago. Here is how it started...
On Friday, I walked past a mini-laminator at a warehouse store. Well, almost walked past it. I love little gadgets that can inspire new crafts (as if I need more options), and just had to justify this nifty new toy to add to my collection. After a couple circles around the aisle I began channeling that inner teacher and it hit me- laminated worksheets!
As background, Caroline (the oldest kid) has been showing me letters she has drawn with such pride lately. She recognizes the letters and wants very badly to be able to write them all. I have been trying to encourage her to practice. However, I get a little bored drawing dots and she really wants to practice “on her own” instead of with me helping her. Therefore, by printing and laminating the sheets, she can trace and draw over them with a dry erase marker or crayons, show me, and then wipe them clean to use over and over.
I’m sure you can already guess, I bought the laminator.
Here is what we used for the project:
6 sheets of 26 lbs White Paper
3- 3 MIL Laminator Pockets
1- Personal Laminating Machine (I picked mine up at Costco for under $20 and it included 100 laminating packets in three sizes)
1- Dry erase marker
Web resource: First-School Preschool Activities and Crafts
After we found the web site, the whole project, took my helper and I about 10 minutes to complete.
Here is what we did:
First, we hit the internet and found this great resource, First-School Preschool Activities and Crafts, and found the "handwriting" section. (I have bookmarked this web site for the next time I need to feel like a Super-Mom)
Second, we picked out and printed these sheets:
1. All Letters Practice Sheet, Back to School theme, different themes are available (Print 1)
2. Preschool Blank Practice Sheet (Print 2 Portrait, 1 Landscape)
3. Number Train (Print 1)
4. Story Paper (Print 1)
Printing Notes: Initially, I printed each on its own sheet of paper and then matched them up when I put them through the laminator. If you use a slightly thicker paper (I used 26 lbs, and typical copy paper is 20 lbs), you can print front-back and barely tell what is on the opposite side. The laminator instruction manual warns that if you use paper that is too thick, it may not properly seal on the edges.
Third, we paired a blank practice sheet with each activity sheet, put them in a laminating sheet pocket and ran them through the machine. These are the pairings I did because I wanted her to have a somewhat blank side to each sheet (pictured below).
Pair 1: Letters- Blank Practice Sheet (Portrait)
Pair 2: Number Train- Blank Practice Sheet (Landscape)
Pair 3: Story Paper- Blank Practice Sheet (Portrait)

So far, she loves them and has been practicing her letters for a little while now. The project went fast enough, less than 10 minutes from printing to laminating, to keep her four year old attention span until the first sheet was ready for her to use.
I need to go get some fun colored dry erase markers! Next, find some sheets the two and a half year old will enjoy.
I'm sure we will find many more uses for this laminator- pictures, bookmarks, signage for my craft fair booth, placemats, leaf pressing!
What projects will you make with yours?
Here are some pictures of the laminating steps (very easy):

2. Line the folded edge of the laminating pocket up with the machine (helps reduce bubbles)

3. Feed the pocket into the machine and watch it roll through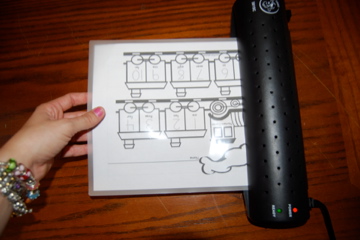
Another great web site we use all the time is www.icanteachmychild.com. It has a lot of great lessons and projects!
ReplyDeleteI need to get one of those nifty little machines, I didn't know they sold them at Costco. It's on the list of things to do this weekend now, great job with the worksheets, I need to make some of those for the girls.
ReplyDeleteThanks, Cindee! I will check that one out too.
ReplyDeleteSmith Family, They will love them! I think I want to print out some faces next so they can add hair, mustaches, etc!
Friends had to fly out to CA this morning, last minute trip. So, I made them a few sheets and gave them some dry erase markers to take on the plane for their 2.5 year old. I can't wait to hear if they were useful