Friday, February 8, 2013
Spray Paint Strikes, Again!
The red chandelier hanging from the Magnolia tree looks so wonderful, especially when the cardinals oblige by hanging out on the tree branches. Their splashes of red accents really spruce up the backyard!
While I was painting the chandelier, I was also working on this mirror. Alternating between the white and red paint let one color dry while I painted the other object. Time management!
The mirror is one we had purchased for our old house. It hadn't found it's place at the new house, at least not in it's golden glory! Painting it white was really the only way to save it for our new space.
Here is what I did:
1. Rubbed the frame down with some steel wool, just to rough it up a bit and help the paint stick.
2. Wiped down the old mirror frame with a damp cloth to remove dust.
3. Taped paper over the mirror part. (My four-year old helped with this part, as you can tell. We couldn't find newspaper, and working with the 8.5" x 11" pieces of paper was easier than working with a garbage bag.)
4. Paint. I didn't try to get the paint on very thick with each coat. It was more of a light coat each time I sprayed it to help not have any drips.
5. Hung it on the wall.
What I learned:
1. Light coats of spray paint really are so much better to prevent drips.
2. If you see a drip, gently touch it quickly before it dries. It will kindof "heal" itself if you get it fast enough.
3. When going from a dark frame to a light color, consider applying caulk or filler to the joints before you paint. The corner joints of the mirror are much more noticeable now that it is painted white. This will eventually drive me crazy and I will take the mirror down and fill in the gaps, then repaint it.
4. Diligent taping= no scraping. Be sure you tape all the paper seams over the mirror, or you will have to scrape some paint off later.
5. Paint from different angles to get better coverage. If you start from the right on the first coat, start from the left on the second. You will see things you missed the first time.
Happy Creating!
-Carrie
Tuesday, April 3, 2012
Fun with Pipes: Pinned it and Did it!
Source: cometogetherkids.com via Carrie on Pinterest
When I coupled that Pin with a convo from one of my super-creative friends and a trip to Home Depot with the hubs, we now have the coolest water and life-size tinker toy set ever!
![]() |
| Yesterday's Waterpark Construction Project! |
1. We used 3/4" pipes. These are sturdy enough and yet the kids can still help manipulate them.
2. Make sure you get the right attachment to connect the hose to the pipes. We got the wrong connecting piece to connect the hose to the pipe. You need a piece that has no threading on one side and then the threaded "female" end on the other side.
3. Buy the "Contractor Packs." We only bought a few pieces on Sunday to try out the pipe toy and see if we liked it. I went back for more parts on Monday and found "Contractor Packs" of straight, "T", and elbow connectors. These are packs of 10 and you basically get a connector or two for free when you buy these packs.
4. Cut the majority of the pipes a standard size. We decided to cut the pipes to 2' long sections. By having the majority of the set of basically the same size, it is easier to construct different contraptions. We have a few pieces that we just use at the end of pipes to provide stability and they are random short lengths. We also left the "carwash" pipe 4' long as it goes over their heads and we didn't want it to be able to break to easily above them.
5. Don't forget the end caps. We forgot end caps the first day and had to rely on duct tape to close off the ends of the pipes. (Duct tape totally worked, but it is so much easier with the end caps)
6. Don't glue them together. The pipes stayed together well enough that we didn't have to glue anything together, which is awesome since now we can create something new tomorrow.
7. Spray-painting the pipes. I painted the pipes that have holes in them so it would be easier to pull them out of the box as we create. The paint on the ends of the pipes makes it just a bit harder to get the connectors off at the end of playtime, but otherwise has added some fun to our set.
My kids are 3 and almost 5 and have played with these pipes for two days in a row. Although they cannot connect the pipes by themselves yet, I know its not going to take long before they are creating their own waterparks. It has probably taken us about 10 minutes to set up the waterpark and then they have played with it for at least an hour each time. We already had three pipes, and then spent about $20 on all of the connectors and another pipe. Pipes are about $1.50 each, and we have a lot more connectors than we can use at one time. Its good to have options, right?
A special thank you to ComeTogetherKids for sharing this great idea I found on Pinterest. I have just spent some time poking around her blog and she has some other super fun ideas that I know we will need to try out! Please swing by her blog or Facebook page.
Follow me on Pinterest
Thursday, February 23, 2012
Top 10 Things to do with Mardi Gras Beads
1. Ring the Mommy
Ok, putting the necklace around your neck, or their own, is probably the first thing your kid will do and I understand its not very creative. However, your child may not be very efficient at getting the necklace on you or themselves at first, but they will get better. They are practicing motor skills.
2. Pouring is SO. MUCH. FUN!
We came up with this idea at a local Pizzeria when we had a pile of beads, three kids, and requested a few plastic cups. Put the beads in one cup and then dump them into another cup. Yes, its that simple, but set up this activity and watch how long your kid will play. (And feel proud that you aren't cleaning up water from all over your bathroom or kitchen) When you add another kid, or five, you can have them work together to pour the beads into a friend's cup.
3. Beads as (Pretend) Food.
Beads are just fun for them to play with and the kids love to use their imaginations. Yesterday I was handed this plate of grapes to eat by my four year old.
Beads as a Tossed Salad (I took this picture about a year ago after the kids went to bed. They had left this in the playroom. It's totally not staged.)
4. "Sensory" Table (aka, Water Table, Fancy Bucket or Tub) Filler
Basically, any entertaining of your tot that would require water could be done with a pile of these beaded necklaces. Instead of putting water in the water table, put beads and reduce the mess that gets all over your kid.
8. Tea Party Dress Up
10. Make Music
Once you have a strand or two of beads in a bottle, put the top back on and shake them like maracas. Then put other beads on and march around your house as a parade. It's a great stress reliever!
I am sure you will come up with lots of other ways to add some creative play with your beads. If you do, please share!
If you don't have any beads, and just have to have some after reading this post, I have seen them at the dollar store, party store, and even Target. Or, just wait a month for the local St. Patrick's Day Parade and get some then!
More notes-
- We get rid of any necklaces that break.
- Beads contain small parts and you should always be aware of manufacturers warnings.
Friday, August 26, 2011
My Favorite Creation: Felt Board (Yep, 'I Made It')
Ok, well, my kids are actually my favorite creation, but this is a close second.
Monday, June 20, 2011
'I Made It' Monday: Let Summer (Pre)School Begin!
It is "summer vacation" for us, which means that instead of going to preschool for 9+ hours a week our now four year old daughter is home, all the time. I love her to bits, but she is busy. She and her two and a half year old brother can get a little stir crazy in their daily attempts to wear me out. This summer, though, I am trying to persevere by finding the right combination of structured (activities and outings) vs unstructured (time they can play with their toys, and mommy can too) time!
Overall, we are enjoying not being on someone else’s schedule and with the help of friends, we are filling our time quite nicely. I see when a week of summer camp fun may be neccessary around mid-July, in the meantime, I am trying to avoid being on a daily camp schedule.
As part of our structured time, and in my attempt to fulfill my need to teach my kids, I am trying to continue the kids' concrete learning- letters, numbers, and maybe even reading a word or two.
Today, I channeled the teaching career path I was supposed to take (at least that is what the nuns told me I should do when I grew up) and find some ways to help her learn how to write her ABCs and I arrived at a project that was hatched a few days ago. Here is how it started...
On Friday, I walked past a mini-laminator at a warehouse store. Well, almost walked past it. I love little gadgets that can inspire new crafts (as if I need more options), and just had to justify this nifty new toy to add to my collection. After a couple circles around the aisle I began channeling that inner teacher and it hit me- laminated worksheets!
As background, Caroline (the oldest kid) has been showing me letters she has drawn with such pride lately. She recognizes the letters and wants very badly to be able to write them all. I have been trying to encourage her to practice. However, I get a little bored drawing dots and she really wants to practice “on her own” instead of with me helping her. Therefore, by printing and laminating the sheets, she can trace and draw over them with a dry erase marker or crayons, show me, and then wipe them clean to use over and over.
I’m sure you can already guess, I bought the laminator.
Here is what we used for the project:
6 sheets of 26 lbs White Paper
3- 3 MIL Laminator Pockets
1- Personal Laminating Machine (I picked mine up at Costco for under $20 and it included 100 laminating packets in three sizes)
1- Dry erase marker
Web resource: First-School Preschool Activities and Crafts
After we found the web site, the whole project, took my helper and I about 10 minutes to complete.
Here is what we did:
First, we hit the internet and found this great resource, First-School Preschool Activities and Crafts, and found the "handwriting" section. (I have bookmarked this web site for the next time I need to feel like a Super-Mom)
Second, we picked out and printed these sheets:
1. All Letters Practice Sheet, Back to School theme, different themes are available (Print 1)
2. Preschool Blank Practice Sheet (Print 2 Portrait, 1 Landscape)
3. Number Train (Print 1)
4. Story Paper (Print 1)
Printing Notes: Initially, I printed each on its own sheet of paper and then matched them up when I put them through the laminator. If you use a slightly thicker paper (I used 26 lbs, and typical copy paper is 20 lbs), you can print front-back and barely tell what is on the opposite side. The laminator instruction manual warns that if you use paper that is too thick, it may not properly seal on the edges.
Third, we paired a blank practice sheet with each activity sheet, put them in a laminating sheet pocket and ran them through the machine. These are the pairings I did because I wanted her to have a somewhat blank side to each sheet (pictured below).
Pair 1: Letters- Blank Practice Sheet (Portrait)
Pair 2: Number Train- Blank Practice Sheet (Landscape)
Pair 3: Story Paper- Blank Practice Sheet (Portrait)
So far, she loves them and has been practicing her letters for a little while now. The project went fast enough, less than 10 minutes from printing to laminating, to keep her four year old attention span until the first sheet was ready for her to use.
I need to go get some fun colored dry erase markers! Next, find some sheets the two and a half year old will enjoy.
I'm sure we will find many more uses for this laminator- pictures, bookmarks, signage for my craft fair booth, placemats, leaf pressing!
What projects will you make with yours?
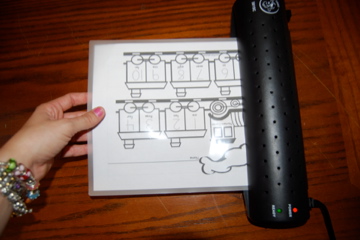
Here are some pictures of the laminating steps (very easy):
2. Line the folded edge of the laminating pocket up with the machine (helps reduce bubbles)
3. Feed the pocket into the machine and watch it roll through