Showing posts with label mondays. Show all posts

Monday, June 27, 2011

'I Made It' Monday: No Sew Fairy Wings


I first made these wings last week, but they came out so cute that I decided to recreate them for you today. Besides being cute, our daughter loves them! There are no wires to get poked with, no pantyhose like material to get a hole in, and they gracefully flap when she moves.

Without further ado, I present the no sew fairy wings!

Here is what you will need:
18" Mesh Tulle (this is the tulle with wider holes)
16" Traditional Tulle (much smaller holes)
24" of ribbon (I used 1.5" wide Offray ribbon)
24" of skinny elastic (I used 1/8th inch elastic)
Scissors
Rotary Cutter (optional- you can substitute scissors)
Clothespin or Other Clip
Ruler


The hardest part of making these wings is picking what colors you want the tulle to be. This pair is going to be light pink (mesh tulle) and bright pink (traditional tulle). When you pick out your tulle at the store, you could very easily make this a "No Sew AND No Cut" project by having the clerk cut the tulle to the needed lengths. Then, all you have to do at home is assemble.

Gather your materials and here is how to make them:

1. Make all of your cuts.
Cut the tulle, ribbon, and elastic to the lengths specified above.
Tulle can be a little unruly to cut because it slips and slides, so just do your best. I like to line it up and lay it as flat as possible and then hold it down with a ruler so I can use my rotary cutter to get a somewhat straight cut.

2. Assemble the ribbon/elastic portion.
Get the elastic. Put the ends together and tie a knot in it.
Take your elastic circle and line up the middle of the elastic loop with the middle of the ribbon.
Tie the elastic around the ribbon (see pic- I like to hide the knot on the elastic in the knot with the ribbon. You are doing this so your little fairy doesn't pull the elastic out when she puts the wings on).
Set the ribbon/elastic to the side.


3. Folding the tulle.
Lay out your mesh tulle and then lay the traditional tulle on top.
Fold the tulle in half, with the traditional tulle sandwiched between the mesh tulle (the traditional tulle will probably be a little shorter than the mesh tulle. Don't worry, it will look great when you are done).
Fan fold or gather the tulle in about 1" folds, back and forth until you have folded/gathered the whole thing.
Use your clothespin/clip to hold the folded tulle together so you can get your ribbon (If you have a 4 year old helper, you can ask them to hold it while you get the ribbon.)

4. Finishing the wings.
Find the middle of your wings and move your clothespin to mark the center. This is where you will be tying the ribbon and elastic you assembled earlier. (I lay mine back on the ruler and use the ruler as a guide).
Lay the tulle bundle on the ribbon/elastic, making sure the elastic bands go out to different sides.
Tie the ribbon around the bundle and make a bow.
Trim the ends of the ribbon to your liking.
Ta da! No Sew Fairy Wings


Now, find your fairy-child and watch how they fly! It always warms my heart to see the kids enjoying things I create for them.

Total Cost: Less than $5 (not counting tools- scissors, ruler, etc)
Time to Make: About 10 minutes after you get the materials together

***************************

Additional Notes:

By using a small amount of heat, you can seal the ends of the ribbons to prevent fraying. I take a lighter and run it back and forth along the cut edge of the ribbon. Be careful not to hold it too close or you will blacken the ends of the ribbon. If this happens, just trim it off and try again.

My thoughts when brainstorming about this project:
- 18" on the mesh tulle is just enough to stick out from around her shoulders
- 16" on the traditional tulle leaves a little bit of a gap between the two colors so it creates a bit of a silhouette
- You could easily make the wings bigger or smaller depending on the look your fairy wants.
- The mesh tulle is thicker and stands up on its own so it helps to provide structure to the wings
- Store bought wings typically have metal or wire to hold the up, which I think can be a little dangerous. These wings are totally flexible.
- If you have a fast flying fairy, then you already know how likely it is that you will quickly need to need repair or replace metal wings because the easily get holes. Tulle is somewhat forgiving and because these are bunched a hole could more easily be disguised. Tulle is also very inexpensive.
- I created these for a little Fairy and Pirates Tea Party we had with a few friends. They were easy enough to make for each girl and they took them home as a gift.

*****************

In the first picture is my fast-growing fairy, Caroline! She is sipping her pink fairy tea which I am sure helped her to fly. Her flower headpiece is simply a flower lei, folded in half. The adorable tulle skirt was a gift and is one of her faves.

***************
Other 'I Made It' Post:

Monday, June 20, 2011

'I Made It' Monday: Let Summer (Pre)School Begin!


It is "summer vacation" for us, which means that instead of going to preschool for 9+ hours a week our now four year old daughter is home, all the time. I love her to bits, but she is busy. She and her two and a half year old brother can get a little stir crazy in their daily attempts to wear me out. This summer, though, I am trying to persevere by finding the right combination of structured (activities and outings) vs unstructured (time they can play with their toys, and mommy can too) time!


Overall, we are enjoying not being on someone else’s schedule and with the help of friends, we are filling our time quite nicely. I see when a week of summer camp fun may be neccessary around mid-July, in the meantime, I am trying to avoid being on a daily camp schedule.


As part of our structured time, and in my attempt to fulfill my need to teach my kids, I am trying to continue the kids' concrete learning- letters, numbers, and maybe even reading a word or two.


Today, I channeled the teaching career path I was supposed to take (at least that is what the nuns told me I should do when I grew up) and find some ways to help her learn how to write her ABCs and I arrived at a project that was hatched a few days ago. Here is how it started...


On Friday, I walked past a mini-laminator at a warehouse store. Well, almost walked past it. I love little gadgets that can inspire new crafts (as if I need more options), and just had to justify this nifty new toy to add to my collection. After a couple circles around the aisle I began channeling that inner teacher and it hit me- laminated worksheets!


As background, Caroline (the oldest kid) has been showing me letters she has drawn with such pride lately. She recognizes the letters and wants very badly to be able to write them all. I have been trying to encourage her to practice. However, I get a little bored drawing dots and she really wants to practice “on her own” instead of with me helping her. Therefore, by printing and laminating the sheets, she can trace and draw over them with a dry erase marker or crayons, show me, and then wipe them clean to use over and over.


I’m sure you can already guess, I bought the laminator.


Here is what we used for the project:

6 sheets of 26 lbs White Paper

3- 3 MIL Laminator Pockets

1- Personal Laminating Machine (I picked mine up at Costco for under $20 and it included 100 laminating packets in three sizes)

1- Dry erase marker

Web resource: First-School Preschool Activities and Crafts


After we found the web site, the whole project, took my helper and I about 10 minutes to complete.


Here is what we did:


First, we hit the internet and found this great resource, First-School Preschool Activities and Crafts, and found the "handwriting" section. (I have bookmarked this web site for the next time I need to feel like a Super-Mom)


Second, we picked out and printed these sheets:


1. All Letters Practice Sheet, Back to School theme, different themes are available (Print 1)

2. Preschool Blank Practice Sheet (Print 2 Portrait, 1 Landscape)

3. Number Train (Print 1)

4. Story Paper (Print 1)


Printing Notes: Initially, I printed each on its own sheet of paper and then matched them up when I put them through the laminator. If you use a slightly thicker paper (I used 26 lbs, and typical copy paper is 20 lbs), you can print front-back and barely tell what is on the opposite side. The laminator instruction manual warns that if you use paper that is too thick, it may not properly seal on the edges.


Third, we paired a blank practice sheet with each activity sheet, put them in a laminating sheet pocket and ran them through the machine. These are the pairings I did because I wanted her to have a somewhat blank side to each sheet (pictured below).

Pair 1: Letters- Blank Practice Sheet (Portrait)

Pair 2: Number Train- Blank Practice Sheet (Landscape)

Pair 3: Story Paper- Blank Practice Sheet (Portrait)

So far, she loves them and has been practicing her letters for a little while now. The project went fast enough, less than 10 minutes from printing to laminating, to keep her four year old attention span until the first sheet was ready for her to use.


I need to go get some fun colored dry erase markers! Next, find some sheets the two and a half year old will enjoy.

I'm sure we will find many more uses for this laminator- pictures, bookmarks, signage for my craft fair booth, placemats, leaf pressing!


What projects will you make with yours?


Happy creating and learning!


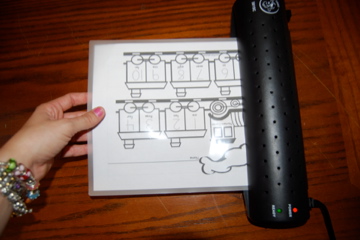
Here are some pictures of the laminating steps (very easy):

1. Load your printed sheets


2. Line the folded edge of the laminating pocket up with the machine (helps reduce bubbles)


3. Feed the pocket into the machine and watch it roll through


You could do this without the laminator by printing out multiple sheets and taking them to one of many places like Office Depot and Kinko’s that now offer laminating services, although you may get a better deal from a local print shop in your area. You could also just keep printing off these worksheets from the site. There are so many available.

(I found First School online by a simple internet search. The laminator I picked was basically an impulse buy, and it works fine, but I have only laminated 4 pages!)

Monday, October 18, 2010

Made for Mondays: Mommy, my baby is cold!


THE PATTERN: McCalls Crafts M4338, Pants G and Top F

THE MATERIALS: less than a half a yard of flannel that let me down when I washed it so I couldn’t use it for the shop; a couple inches of velcro; a few inches of elastic, thread

TIME ELAPSED: About 45 minutes, with a three year old “helper"


As part of my series "Sewing My Way Through the Fabric Store," I am accepting challenges from you all on sewing projects, as well as sharing some of my personal sewing adventures!

This week's post is a challenge from my little girl, who provides inspiration for many of the things I sew. This story is from a couple Saturday mornings ago.

That morning started with quite a to do list of preparation activities for the weeks ahead. The hubs had taken our little boy to the hardware store, so our daughter and I were milling around the house. I had a million things I needed to sew to get ready for the start of the HappyLittleMonkey Craft Show Tour 2010 and the little guy's birthday party, but I was trying to be present with her and her “boy baby.” We had recently made him a swaddling blanket and today she said he needed a burp cloth. Burp cloths, I can do! We dug through the remnants and a few minutes later, we had a suitable burp cloth. Ok, that was fun.

Then came the title plea, "Mommy, my baby is cold."

Hmm...baby already has a swaddling blanket. So, that won't work. What else??? I considered telling her to go get an outfit out of her stash of store bought baby clothes, but this was "boy baby," so clearly a dress wasn't going to work.

So, what to do? It was off to the pattern stash. Found an outfit that could double as pajamas. Perfect! Next, found some flannel I had purchased for the shop, but didn't use. Check, check.

Ok, now, deep breath, collect the rest of the supplies and mentally prepare to sew with a three year old assistant.

Inhale, exhale, and...

We laid out all of the pieces and cut them out. (Details: McCall’s Crafts pattern, M4338. We cut out Pants G and Top F, without the collar.)

For sewing the pants, we followed the directions pretty closely. The only difference I did was to serge the ends of the fabric before hemming them instead of doing a little roll. Since everyone doesn’t have a serger, most patterns instruct you to fold 1/4 inch or so and then the next 1/2 inch and hem. Its just more time consuming and with my three-year old Assistant, time is in short supply.


I really liked the pants directions. On people pants, most of the time the pattern directs you to sew the front and back seams, and then creating a pocket for the elastic at the top. Doll clothes are small and can be a little harder to work with. This pattern directed you to only sew the front seam then sew the elastic pocket, insert the elastic, and then sew the back seam. So easy! I even placed the elastic in the pocket, sewed, and then pulled the elastic to the desired length (about 5 inches of elastic, relaxed).


The shirt was really easy too, especially without the collar. I put velcro up the whole back so that she will eventually be able to get baby dressed by herself.

Here is the final outfit.

Best was the big hug followed by "Mommy, thank you so much." Ok, so totally worth it!