Showing posts with label summer fun. Show all posts

Friday, August 10, 2012

National S'mores Day and Awesome Ideas, Stolen


Today is National S'mores Day!  The list of important holidays in my world goes something like this:

#1. Christmas
#2. Easter
#3. Halloween (which to me means, the most awesome holiday, Christmas, is right around the corner)
#4. Talk Like a Pirate Day

Of course there are birthdays and anniversaries too, but these other days warrant preparation and fun.  Then, today, I find out about National S'mores Day!  I'm adding it to the list!  

I have been drafting a post for a while now about the things that Pinterest, Martha Stewart, and S'mores have in common with the unraveling of the traditional means of succeeding at motherhood. I didn't want to sound bitter, but there is a point to be made.  And here it is:

Pinterest and Martha Stewart are responsible for making mothers everywhere feel like failures.

Regarding Pinterest, how can one thing give so many great ideas and make you feel like a failure because you don't do all these things, all at the same time? Don't get me wrong. I am totally addicted to Pinterest. It can be a great reference tool, but I really hate that now, when I have an original idea, the first thing someone says is, "Did you see that on Pinterest?"  I want to scream, "No, doggone-it. I thought it up in my little pea-brain all by myself." My S'mores idea that I am about to share, all mine!  I came up with it on my own. Just sayin.
Then there is Martha. She has been making us look bad for years, with her "Pay no attention to the throngs of staffers I have behind the curtain" approach to crafting she has had for years. I was just looking through a back issue of Martha Stewart Living magazine (which I am not really sure that I ever subscribed to, but somehow it ends up at my house, so I just HAVE to read it, right?) and on the cover- s’mores.  Yes, right there.  Martha Stewart claiming to upgrade the s’more.  Yes, upgrade the s’more.  “How?” you ask.  She makes the graham crackers from scratch and then adds imported chocolate.  Well, lady, let me tell you.  That may be a little too far.  Besides, years ago, I upgraded the s’more, and I have throngs of people who can vouch for me.  (And if Martha Stewart ever reads this, I'm sorry if I offended you. Really, your staff comes up with some really super cute ideas. I just can't in good conscience cover anything in my house with glitter and I hate paper crafts- paper cuts.)

Back to the S'more. 
The s’more you see, is practically perfect in its store-bought practicality from the get go.  It reminds me of childhood and camping with the Girl Scouts and visiting northern family and campfires.  Have you ever had a bad memory involving a s’more?  I think not.  
Well, you may be wondering where this tangent is going and how exactly I think I could possibly improve the s’more. My upgrade does not at all compromise the simple practicality of the s’more, it simply increases its deliciousness by substituting your favorite chocolate candy for the Hershey's milk chocolate. (Side note: If you weren't using Hershey's Milk Chocolate in the first place, you weren't doing it right anyway. In my opinion.)  My personal favorite is to use the Reese’s Peanut Butter cup.  (Anyone who knows me will not be surprised. I have an addiction, or is it an obsession, with the Reese’s Peanut Butter Egg)

Here is what you do:

1. Go to the store.
2. Buy Graham crackers and large marshmallows.
3. The hard part- buy Hershey's chocolate bars if plain chocolate is your favorite.  If not, substitute Reese's, York's, or any other flat-ish candy bar.
4. Make a fire or use the microwave to make your s'mores.  
5. Eat.
6. SMILE. 

Happy S'mores Day! I know what we will be having for dinner...I mean dessert. :)

And don't let anyone else's ideas ruin your really good ones!


Toast! Raise your marshmallow sticks!

Oh, yeah, and follow me on Pinterest! I have a whole board dedicated to how Reese's Peanut Butter Cups should come out with a star shape for summer, because the break from Easter to Halloween is just too long! :) 
Follow Me on Pinterest

Monday, May 14, 2012

Colored Shaving Cream: Pinned It and Did It

Well, time is escaping me again! In my post Pinned It and Did It: Vertical Clothes I had promised to follow up on other pins, namely Painting with Colored Shaving Cream. Instead, I shared about our Fun with Pipes, which I am happy to report is still fun to play with and entertaining!

Artists at work
Back to the task at hand...How was our experiment with actually doing the the colored shaving cream Pins?  Not so good.

In case you haven't seen the Pins, they typically feature a muffin tin filled with brightly colored shaving cream, or a rainbow mural on the bathtub wall supposedly painted by a small kid. Well, I was hooked and in my determination to not just pin things but to also do them, I finally made it to the store for the supplies.

Have you heard the rule "keep it simple, stupid (KISS)?" Well, the colored shaving cream idea breaks this rule on so many levels and while I am sure that the original pinners meant to provide a really fun activity for their kids.  However, I think they ended up with a really cute blog post and just making a huge unnecessary mess for themselves.

The Pins showed the shaving cream all colored like this.
Here is why I think it didn't go as great as expected:

1. The kids were happier squirting the shaving cream from the can than they were using it out of containers with paint brushes.

2. Food coloring= staining. Unless you are going to be "super serial" about mixing your food coloring and shaving cream, you will have bits of dye that you will have to work to remove later. I have also heard reports of stained tile grout from people who used the idea indoors.

3. We make more work for ourselves by coloring the shaving cream. I dragged out containers, paint brushes, shaving cream, sticks, and food coloring so that the kids could smear shaving cream all over the outside plastic toys. In the end, the kids were playing with the cans of shaving cream and using their hands. I easily could have left out the containers and dye and they would have been just as happy.

Cleaning his car wheels.  The car got a thorough detailing
So, why did I drag out extra stuff and do more work than I needed to? Because I forgot to Keep It Simple, Stupid!! I saw the pin of rainbow shaving cream and imagined the artwork they would create and the hours longer they would play with the shaving cream if it was colored instead of plain ole white. And I dreamed of how they would purposefully try to blend the red and the yellow together to see that it makes orange.

Instead, they just acted like kids with shaving cream. They played. They made a mess. They smelled great!

Having fun!
Yes, and that is my kid sliding across the table to smear the shaving cream. I told you they were just as happy using themselves!

So, add a couple of cans of old school Barbasol type shaving cream to your Dollar Store Shopping list and break them out next time you need your kids to be entertained for a good 30 minutes or so. It will be one of the easiest activities you do with them.

Another note.  If this was a Mythbusters post, the reason they are smearing the shaving cream onto all of the outside plastic toys is that I had heard it helps to get plastic cleaner. Each spring I have to clean everything that hasn't been used during the brutal winter months we have here in Florida (ha, yes, I'm kidding). So, I thought I would get them involved and combine the fun pin with this fun cleaning trick. The plastic stuff got cleaned, but I am not sure I can attribute that to the shaving cream.
------

I will only share the original Pinspiration when its an idea I like/love, but not when its something we aren't successful with doing. For this idea, I do think the thought was very creative and a super cute idea, which is why we did it.  We did, however, end up with little flecks of food coloring on the plastic outside toys, and on the kids.  Besides, they had just as much fun with plain ole shaving cream, so why do the extra work?!?

Happy Pinning and Playing!


Follow Me on Pinterest

Tuesday, April 3, 2012

Fun with Pipes: Pinned it and Did it!

It's already starting to get hot here, and by hot I mean in the 80s and 90s.  In looking for some fun ideas, I remembered this Pin from Pinterest on making a Kid/Carwash:

When I coupled that Pin with a convo from one of my super-creative friends and a trip to Home Depot with the hubs, we now have the coolest water and life-size tinker toy set ever!

Yesterday's Waterpark Construction Project!
Here is what we have learned:

1. We used 3/4" pipes.  These are sturdy enough and yet the kids can still help manipulate them.

2. Make sure you get the right attachment to connect the hose to the pipes.   We got the wrong connecting piece to connect the hose to the pipe.  You need a piece that has no threading on one side and then the threaded "female" end on the other side.

3. Buy the "Contractor Packs."  We only bought a few pieces on Sunday to try out the pipe toy and see if we liked it.  I went back for more parts on Monday and found "Contractor Packs" of straight, "T", and elbow connectors.  These are packs of 10 and you basically get a connector or two for free when you buy these packs.

4. Cut the majority of the pipes a standard size. We decided to cut the pipes to 2' long sections.  By having the majority of the set of basically the same size, it is easier to construct different contraptions.   We have a few pieces that we just use at the end of pipes to provide stability and they are random short lengths.  We also left  the "carwash" pipe 4' long as it goes over their heads and we didn't want it to be able to break to easily above them.

5. Don't forget the end caps.  We forgot end caps the first day and had to rely on duct tape to close off the ends of the pipes.  (Duct tape totally worked, but it is so much easier with the end caps)

6. Don't glue them together.  The pipes stayed together well enough that we didn't have to glue anything together, which is awesome since now we can create something new tomorrow.

7. Spray-painting the pipes.  I painted the pipes that have holes in them so it would be easier to pull them out of the box as we create.  The paint on the ends of the pipes makes it just a bit harder to get the connectors off at the end of playtime, but otherwise has added some fun to our set.

My kids are 3 and almost 5 and have played with these pipes for two days in a row.  Although they cannot connect the pipes by themselves yet, I know its not going to take long before they are creating their own waterparks.   It has probably taken us about 10 minutes to set up the waterpark and then they have played with it for at least an hour each time.  We already had three pipes, and then spent about $20 on all of the connectors and another pipe.  Pipes are about $1.50 each, and we have a lot more connectors than we can use at one time.  Its good to have options, right?

A special thank you to ComeTogetherKids for sharing this great idea I found on Pinterest.  I have just spent some time poking around her blog and she has some other super fun ideas that I know we will need to try out!  Please swing by her blog or Facebook page.  

Follow me on Pinterest

Monday, July 25, 2011

'I Made It' Monday: Come Jam With Me!

"Canning has a way of making everything better."

In the past few months I have been trying to make a point to try some new things. My newest venture- canning!


My friend and “cousin-in-law,” Helen of Miss Mermaid Shop, used to make me laugh a little because she does things like tend to a garden and chickens, bake her own foods, and even paid attention to when fruits were freshest and would can them. Oh, and she has two young kids and a growing business like me and, I just had no idea how she could do all of these extra things. Well, some of it she had to do because of her daughter’s allergies, but I digress. The canning was optional.


Recently, I started researching canning and after finding some wonderful resources, decided I would try it.


Oh, my, goodness, it is so much fun!


Never have I considered myself a “foodie” as I would love to try to exist on pizza, grilled cheese, PB&J, and pasta. However, I have been paying a lot more attention to what we feed ourselves as we try to feed our kids better. Afterall, why would we not care what we feed ourselves but care what we feed our kids? That’s food for thought.


High fructose corn syrup, artificial colors numbered whatever, chemical names I don’t know, and who knows what else. If I can control what goes in, it will be better for us, right?


This project is a little more expensive initially than the others I have shared, but in the long run, I believe it will save you money if you enjoy doing it and capitalize by purchasing supplies in season.


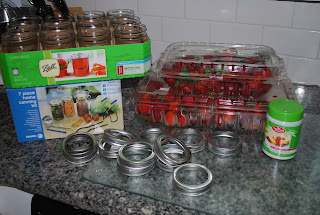
After surfing the net, I had my list of needed tools:

Jar lifter

Funnel

Magnet wand (every project should require a wand)

Rack

Jars


I went to a local kitchen store, Panhandlers Kitchen Supply (mom-owned!), hoping to find a great kit and hopefully clarify some of the process in my head. (Tip: When starting a new project, I love finding local experts to get information and tips. Going to big stores is practically useless for this, as they just sell stuff and don’t do it themselves.) Audrey, store owner, had the perfect kit with stainless steel parts (including the funnel, they are plastic in the popular Ball kit available at Walmart) and was able to answer my questions.

This kit cost just under $30, and will be used over and over again. You can pick up two kits at Walmart (one with a plastic funnel about $7, and the other with a silicon rack for about $11).


Here is what I asked:

1. Sterilizing jars- Do I sterilize them and then heat them up while I’m making the jar contents? Yes and most dishwashers have a “sanitary” cycle. You can use that.

2. Can I use a regular pot I already have? Yes. It is just important for water to go over the jars for the sealing process.

3. When I finish the sealing process, can I just keep the jars on a shelf? Yes.


She also introduced me to the University of Georgia web site on canning: National Center for Home Food Preservation. This web site has more information that one person could ever digest (yes, I had to insert a food pun) on canning.


My main resource for making Strawberry Jam was The Pioneer Woman's site- easy and fun to read, pictures, and humor. Great resource! I am not going to reduplicate her pictures and post on the process, just add some notes about how to do this with a kid. Links to her posts are below.


Ingredients I used (combo of what Pioneer Woman and The UGA site recommended):

5.5 cups of Mashed Strawberries (this took about 4 lbs)

7.5 cups of sugar

1 box powdered pectin

Lemon juice (I cheated and used the bottled kind)


Basic Steps:

1. Gather materials and ingredients. With jam making, things are more time sensitive than other cooking adventures, so its important to get your ingredients measured out as much as possible before you start. So, measure out your sugar, lemon, and pectin (if you aren’t using a box) and set it aside.


2. Read through Pioneer Woman: Making Strawberry Jam Part 1 and Part 2. (I will sum up some of what I did in relation to her directions and those from the National Center for Home Food Preservation


3. Wash your jars. I washed them by hand and then sterilized them in boiling water (Put on rack in pot. Turn on heat. After the water starts to boil, leave them in for 10 minutes.). This saved me a little time since I didn’t have to wait for the dishwasher. I put the jars back in the pot to warm them up for jarring too.


4. Hull the berries. I let what I cut off fall onto the cutting board. One kid picked up the cutting and put it in the compost jar. The other was handed the cut berry to put it in the pan. (He actually ate every 5th berry or so, and lost interest in helping very quickly. Oh to be two!) this is how our pan looked when we were down prepping the berries. (Pioneer Woman did this is stages, but we hulled, mashed, and measured all at once)


5. Mash the berries. We used a lasagna pan instead of a cookie sheet because I thought it would be easier to keep the berries contained while we mashed. It did. I recommend pulling your berries from the fridge about an hour or so before you plan to mash them as it makes it easier to mash when they aren’t cold. She and I had to alternate mashing.


6. Measure the mashed berries into the pot. You need 5 cups according to Pioneer Woman, and 5.5 according to the Preservation people. I used 5.5. (We had some mashed berries left. Instead of adding them in, I put them aside and used them as ice cream toppings after dinner.) If you didn’t listen to direction #1, then measure out your sugar now. Once you turn on the heat on the berries, there is no turning back.

7. Follow the Pioneer Woman pictorial and directions for making and jarring the jelly. I let my helper stir the pot of berries and ingredients. Then her daddy came home and she lost interest in making jam and I was left to my own to finish. (I was all torn up, really :)) All I had left to do was pour the jelly into the jars without eating it all first.

8. I sealed the jars according to Pioneer Woman's directions (which were the same as every other resource I checked).


9. Wait for the symphony of pops! Seriously, this part was wonderful. Now, try not to eat all the jam at once.

I so didn’t believe Pioneer Woman when she said “Canning has a way of making everything better” and I can see how this is going to be a new hobby. I was seriously amazed at the sense of accomplishment and yumminess that resulted from these couple of hours in the kitchen.


Here is the result, before I made all the jars pretty with a fabric accent, and after we had devoured one jar.


Monday, June 20, 2011

'I Made It' Monday: Let Summer (Pre)School Begin!


It is "summer vacation" for us, which means that instead of going to preschool for 9+ hours a week our now four year old daughter is home, all the time. I love her to bits, but she is busy. She and her two and a half year old brother can get a little stir crazy in their daily attempts to wear me out. This summer, though, I am trying to persevere by finding the right combination of structured (activities and outings) vs unstructured (time they can play with their toys, and mommy can too) time!


Overall, we are enjoying not being on someone else’s schedule and with the help of friends, we are filling our time quite nicely. I see when a week of summer camp fun may be neccessary around mid-July, in the meantime, I am trying to avoid being on a daily camp schedule.


As part of our structured time, and in my attempt to fulfill my need to teach my kids, I am trying to continue the kids' concrete learning- letters, numbers, and maybe even reading a word or two.


Today, I channeled the teaching career path I was supposed to take (at least that is what the nuns told me I should do when I grew up) and find some ways to help her learn how to write her ABCs and I arrived at a project that was hatched a few days ago. Here is how it started...


On Friday, I walked past a mini-laminator at a warehouse store. Well, almost walked past it. I love little gadgets that can inspire new crafts (as if I need more options), and just had to justify this nifty new toy to add to my collection. After a couple circles around the aisle I began channeling that inner teacher and it hit me- laminated worksheets!


As background, Caroline (the oldest kid) has been showing me letters she has drawn with such pride lately. She recognizes the letters and wants very badly to be able to write them all. I have been trying to encourage her to practice. However, I get a little bored drawing dots and she really wants to practice “on her own” instead of with me helping her. Therefore, by printing and laminating the sheets, she can trace and draw over them with a dry erase marker or crayons, show me, and then wipe them clean to use over and over.


I’m sure you can already guess, I bought the laminator.


Here is what we used for the project:

6 sheets of 26 lbs White Paper

3- 3 MIL Laminator Pockets

1- Personal Laminating Machine (I picked mine up at Costco for under $20 and it included 100 laminating packets in three sizes)

1- Dry erase marker

Web resource: First-School Preschool Activities and Crafts


After we found the web site, the whole project, took my helper and I about 10 minutes to complete.


Here is what we did:


First, we hit the internet and found this great resource, First-School Preschool Activities and Crafts, and found the "handwriting" section. (I have bookmarked this web site for the next time I need to feel like a Super-Mom)


Second, we picked out and printed these sheets:


1. All Letters Practice Sheet, Back to School theme, different themes are available (Print 1)

2. Preschool Blank Practice Sheet (Print 2 Portrait, 1 Landscape)

3. Number Train (Print 1)

4. Story Paper (Print 1)


Printing Notes: Initially, I printed each on its own sheet of paper and then matched them up when I put them through the laminator. If you use a slightly thicker paper (I used 26 lbs, and typical copy paper is 20 lbs), you can print front-back and barely tell what is on the opposite side. The laminator instruction manual warns that if you use paper that is too thick, it may not properly seal on the edges.


Third, we paired a blank practice sheet with each activity sheet, put them in a laminating sheet pocket and ran them through the machine. These are the pairings I did because I wanted her to have a somewhat blank side to each sheet (pictured below).

Pair 1: Letters- Blank Practice Sheet (Portrait)

Pair 2: Number Train- Blank Practice Sheet (Landscape)

Pair 3: Story Paper- Blank Practice Sheet (Portrait)

So far, she loves them and has been practicing her letters for a little while now. The project went fast enough, less than 10 minutes from printing to laminating, to keep her four year old attention span until the first sheet was ready for her to use.


I need to go get some fun colored dry erase markers! Next, find some sheets the two and a half year old will enjoy.

I'm sure we will find many more uses for this laminator- pictures, bookmarks, signage for my craft fair booth, placemats, leaf pressing!


What projects will you make with yours?


Happy creating and learning!


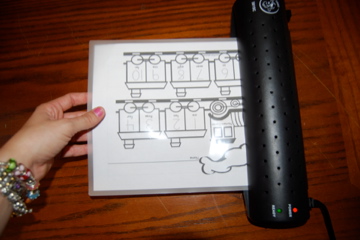
Here are some pictures of the laminating steps (very easy):

1. Load your printed sheets


2. Line the folded edge of the laminating pocket up with the machine (helps reduce bubbles)


3. Feed the pocket into the machine and watch it roll through


You could do this without the laminator by printing out multiple sheets and taking them to one of many places like Office Depot and Kinko’s that now offer laminating services, although you may get a better deal from a local print shop in your area. You could also just keep printing off these worksheets from the site. There are so many available.

(I found First School online by a simple internet search. The laminator I picked was basically an impulse buy, and it works fine, but I have only laminated 4 pages!)